Formatting Your Note Document
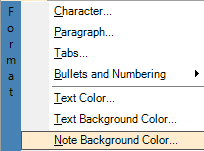
The Note Plugin adds its own Format menu to NoteMagician’s menu, as pictured above. The purpose of these menu options are as follows:
MENU OPTION |
DESCRIPTION |
|---|---|
Presents a dialog where you can set the font, style and size of the text for the selected text. If no text is selected, then subsequent text entered at the cursor position will have these attributes. |
|
Sets the alignment, spacing and indentation for the current paragraph. |
|
Sets the position and types for tabs in the current paragraph. If not set, default tab settings will be used. |
|
Sets the type of list, if any, for the current paragraphs. |
|
Text Color |
Short cut for setting the foreground text color. |
Text Background Color |
Short cut for setting the background text color. |
Note Background Color |
Short cut for setting the note’s document background color. |
Character Formatting
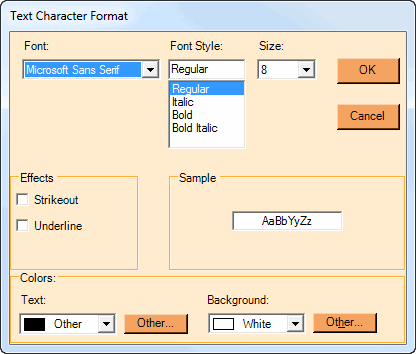
The character formatting dialog appears below. Following is a table outlining the options on that dialog.
DIALOG ITEM |
DESCRIPTION |
|---|---|
Font |
Select the font family for your text characters. |
Font Style |
Choose the bold and italic settings for your desired look. |
Size |
Select the font size, in points. A point is 1/120 of an inch. So, for example, 10 points will be 12 characters per inch. |
Effects |
Check either or both boxes for |
Sample |
Shows you what your current selections will look like. |
Text |
Select the text foreground color. Choose a basic color from the drop down, or use the Other button to bring up a comprehensive color picker. See the Color Dialog topic for details on using the color picker for custom colors. |
Background |
Select the text background color. Choose a basic color from the drop down, or use the Other button to bring up a comprehensive color picker. See the Color Dialog topic for details on using the color picker for custom colors. |
Paragraph Formatting
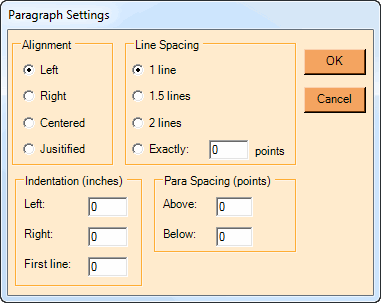
Paragraph formatting affects the paragraph where the current cursor position sits. The paragraph formatting dialog appears below. Following is a table outlining the options on that dialog.
DIALOG ITEM |
DESCRIPTION |
|---|---|
Alignment |
Choose the basic alignment of this paragraph. The Note Plugin toolbar has shortcuts for these selections as well. |
Line Spacing |
Choose the spacing of the lines within this paragraph. |
Indentation |
This group is used to select indentation parameters for this paragraph. |
Indent: Left |
Indentation of all lines away from the left edge. Enter a decimal number of inches between 0 and 20. |
Indent: Right |
Indentation of all lines away from the right edge. Enter a decimal number of inches between 0 and 20. |
Indent: First line |
Additional indentation of the first line beyond the Left setting. |
Paragraph Spacing |
Enter the number of points above and below this paragraph that you wish to have left blank between the preceding or following paragraph. 12 points is 1/10 inch. |
Tabs
Tab settings affect the paragraph where the current cursor position sits. In general this dialog works as follows for each tab:
To create a new tab:
- Enter the tab stop position in inches
- Select the alignment and leader for the tab
- Press New
To change a tab:
- Select the tab from the tab list
- Change the parameters as desired
- Press Change
To remove a tab:
- Select the tab from the tab list
- Press Clear
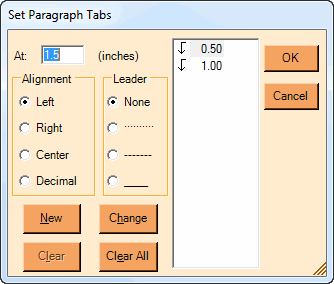
The tab setting dialog appears below. Following is a table outlining the options on that dialog:
DIALOG ITEM |
DESCRIPTION |
|---|---|
At: |
Enter the decimal number of inches for this tab stop. This number really applies more to the printing of this note, as on screen dimensions may be deceiving based on your screen resolution. |
Alignment |
Choose the alignment for this tab: From Left edge, from the Right edge, or in the Center of the page. |
Leader |
Choose the style of the lead-in character string to precede (or follow for right alignment) the tab. |
Lists: Bullets and Numbering
The Note Plugin provides several of choices for numbering paragraphs. The simplest support is provided by the tool bar with two icons, Bullets and Numbered. Pressing these buttons will change the current selection, or if no selection is made, the current line, to the appropriate type of list. These buttons will “stay down” as long as the cursor is in a list of that type. Pressing the button again when the cursor is in the list will remove the list attribute and return that text to plain text.
For more versatile list numbering, use the Format ![]() Bullets and Numbering menu shown below:
Bullets and Numbering menu shown below:
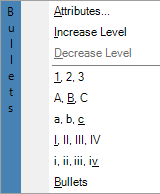
Your options on this menu are:
MENU OPTION |
DESCRIPTION |
|---|---|
Attributes |
Discussed further below, this option will bring up a dialog that will give you complete flexibility over the selected list or portion of a list. |
Increase Level |
Change the selected lines (or the line with the cursor if no line is selected) to be on the next list level. Up to nine levels are supported. When you increase the level you might want to set the Number style to make sense for your use. |
Decrease Level |
Reduce the level of the selected lines or the line with the cursor if no lines are selected. |
numbering styles |
The last 6 options change the selected lines to use the number style shown. |
List Formatting Attribute Dialog
When you want more control over your lists, choose the Attributes option from the Format. You will see the dialog below:
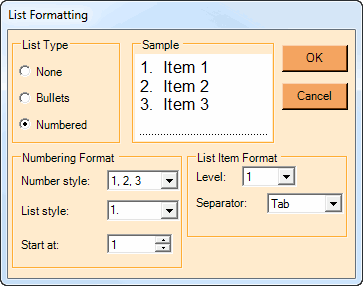
Your selections on this menu affect the currently selected lines from your note. See the table below for their meanings:
DIALOG ITEM |
DESCRIPTION |
|---|---|
List Type |
Choose the basic type of list from None, Bullets and Numbered. What you choose may reveal different options elsewhere in this dialog.. |
Number style |
You can choose from numbers, letters or Roman numerals, in upper or lower case. |
List style |
Select from various formats for your numbering. Each item in the list shows what the first item in your list would look like. |
Start at |
Usually you will start numbering from 1. However, the Note Plugin allows you to start at other numbers. |
Level |
List level. Level “1” is the first level for a list. Each subsequent level is generally indented from the previous level, and would have a different Number style. You could also change any other aspects of that level on this screen. |
Separator |
Choose what character will follow your line numbers. Your choices are None, Space or Tab. |
Bullet Character (not shown) |
When you have a bulleted list, you can choose what character will be your bullet character. There will be a dropdown for some standard bullet styles, or you can choose one from a grid of characters when you choose Other and press the “…” button. |